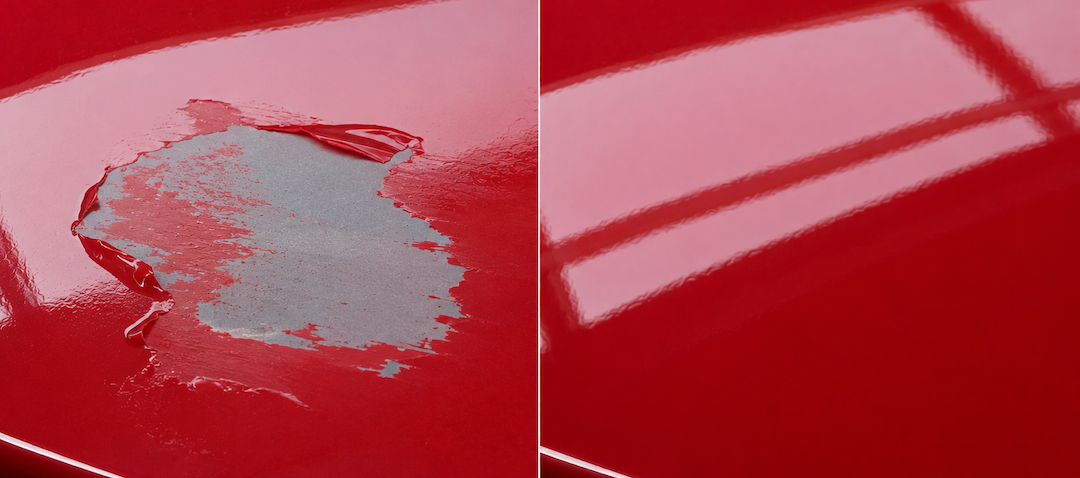
Lifting or bubbling in fresh paint is usually caused by inadequate surface prep, mixing incompatible paint products, moisture, or coats applied too heavy. The fix: sand back to a sound surface, address the cause, then reapply in thin coats using your ScratchesHappen kit's matched products.
Quick Reference
What you saw at application | Likely cause | Fix |
|---|---|---|
Paint won't bond, lifts off after application or during curing | Incompatible products mixed together | Use the primer, paint, and clear coat from your ScratchesHappen kit together |
Paint won't bond — peels or lifts off the surface beneath | Inadequate surface prep (contamination or no scuff) | Wash with dish detergent, rinse, dry, and lightly scuff glossy surfaces before painting |
Paint bubbled after painting in humid or damp conditions | Moisture trapped in the surface | Wait for the surface to be fully dry; avoid painting in early morning or high humidity |
Paint bubbled in heavily-coated areas | Coats applied too heavy | Apply thinner coats with full flash time between each |
Cause 1: Mixing Different Paint Products
The primer, paint, and clear coat in your ScratchesHappen kit are matched to work as a system. Some combinations of products from different paint systems aren't compatible — one well-known example is applying a 2K (two-component urethane) clear coat over lacquer paint, which causes the lacquer to lift because the hardener in 2K systems reacts with lacquer chemistry. Most modern automotive paint products are compatible with each other, but the simplest way to avoid this category of problem is to use the kit's matched products.
The Fix
Use the primer, paint, and clear coat that came in your ScratchesHappen kit together. If you've already painted with mixed products and seen lifting, sand the affected area back to a sound surface and reapply using the matched kit products.
Cause 2: Inadequate Surface Preparation
Paint needs a clean, properly-prepped surface to bond well. Two common failure modes here:
No scuff on a glossy surface
Paint applied directly to smooth, glossy factory paint without scuffing first has nothing to mechanically grip. Even with a clean surface, the new paint can peel or lift because nothing is holding it on.
Contamination
Wax, oil, grease, polish residue, and silicone (common in tire shine sprays) all prevent paint from bonding. Even invisible residue from a previous wash, polish, or wax can cause the new paint to lift in patches where contamination remained./
The Fix
Scuffing: for glossy surfaces, wet-sand with 600-grit sandpaper so the new paint has something to grip — this is the same scuffing step described in the ScratchesHappen Aerosol Instructions. Don't touch the prepped area with bare fingers — skin oils contaminate the surface.
Contamination: before painting, wash the area with dish detergent (which cuts grease well), rinse with clean water, and dry thoroughly. Remove any remaining oils or residue with a prep wipe. [Prep wipe alternative: mixture of 2/3 water to 1/3 isopropyl alcohol.] Lift dust, lint, and particles with a tack cloth.
Cause 3: Moisture
Moisture trapped on or in the surface — early-morning condensation, dew, or paint applied in high humidity — gets sealed under fresh paint and bubbles as it tries to evaporate through the curing film.
The Fix
Wait for the surface to be fully dry before painting. Avoid painting in early morning if condensation is visible, and avoid painting during or right after rain. See Painting in High Humidity for humidity-specific application adjustments.
Cause 4: Coats Applied Too Heavy
Heavy coats trap solvents, moisture, and contamination under a thicker film than they can escape through. The trapped material forms bubbles in the curing layer, and the lower layer can also fail to bond properly because it stays wet underneath.
The Fix
Apply light-to-medium coats with full flash time between each. Most ScratchesHappen repairs need 3–4 light-to-medium coats rather than 1–2 heavy ones. See Drying Time Summary for the timing.
If Your Pattern Looks Different
Creased, fabric-like ridges in the paint surface
That's wrinkling, a different defect with a different fix.
See Why Is My Paint Wrinkling?.
Raised bubbles specifically in the clear coat, after painting in hot conditions
That's the heat-driven case for clear coat.
See Why Is My Aerosol Clear Coat Bubbling?.
Paint lifting where bare metal or plastic was visible in the unrepaired damage
That's an adhesion failure from skipping primer. The repair needs a primer coat between the substrate and the paint.
See When Should I Apply Primer?.
Paint lifting from a plastic part (replacement bumper, spoiler, trim)
The substrate may need adhesion promoter.
See When to Use Adhesion Promoter on Plastic Parts.
FAQ
Will my repair be ruined if it lifted or bubbled?
No — lifting and bubbling are fixable. Sand the affected area back to a sound surface, address the cause using the Quick Reference table above, and reapply. The repair will look right once the underlying cause is removed.
Can I just sand the surface flat and keep going?
You can sand the surface flat, but if the underlying cause isn't addressed (contamination, moisture, incompatible products, heavy coats), the new paint will likely lift or bubble again in the same way. Sand back, identify the cause, then reapply.
What if it keeps happening?
Contact Support with photos in natural daylight, including a shot of the failure and the conditions you were painting in.