Adhesion promoter helps primer + paint bond to bare plastic body parts that primer can't otherwise grip. You'll want it when you're painting a medium to larger area of bare plastic — a new replacement part, a leading edge plastic part, or a whole flexible part like a bumper cover, spoiler, wing, or fender flare or replacement bare plastic side view mirror. For small spot repairs where most of the factory paint is still intact around the damage, adhesion promoter isn't usually needed.
Quick Reference
Your repair | Adhesion promoter? |
|---|---|
Small chip or scratch on a plastic part (factory paint mostly intact around it) | Usually no |
Large area of bare plastic exposed (sanded down past factory coatings) | Yes |
New replacement plastic bumper cover, spoiler, wing, fender flare, or side view mirror (unpainted) | Yes |
Whole flexible plastic part being repainted (bumper, wing, body cladding panel) | Yes |
Whole replacement rocker panel (flexible plastic) | Yes |
Repainting over sound existing primer or paint (no bare plastic showing) | No |
Fiberglass part (some hoods, car panels) | No |
What Is Adhesion Promoter?
Most plastic body parts on modern cars — bumper covers, spoilers, body cladding, fender flares — are made from a low-surface-energy plastic (most commonly TPO, thermoplastic polyolefin). Paint can't bond directly to it. Adhesion promoter is a clear, fast-drying coat that you apply to bare plastic before primer. It chemically prepares the plastic surface so the paint system has something to grip.
Adhesion promoter isn't a primer and isn't a paint. It goes under primer, as a tie coat between medium to large areas of bare plastic and the rest of your repair.
Without it on a meaningful area of bare plastic, paint can flake off the first time the part flexes — a parking-lot bump, a cold morning, a careless shopping cart.
When You Need It
The deciding factor is how much bare plastic the new paint has to bond to.
New large replacement parts that arrive unpainted (bumper covers, spoilers, wings, fender flares, replacement rocker panels). The whole part is bare plastic, so the whole part needs adhesion promoter.
Medium to larger repairs that go down to bare plastic. Sanding through factory coatings across a meaningful area exposes the plastic underneath. Adhesion promoter restores the bonding layer.
Whole-part repaints on flexible plastic. Repainting an entire bumper, wing, or body-cladding panel means the new primer + paint is bonding directly to plastic across the full surface — adhesion promoter is required.
When You Don't Need It
Small spot repairs over a bit of plastic substrate. A chip, a scratch, a small area where the surrounding factory primer and paint are still sound. The new paint bonds to the surrounding paint, which is already adhered to the plastic underneath through the factory coating system. The exposed bare plastic at the chip itself is small enough that the surrounding paint carries the bond for the new primer, paint and clear coat in the spot.
Touch-ups over sound existing primer or paint where no bare plastic is exposed at all.
What You'll Need
Adhesion promoter (sourced online or Amazon — we don't offer adhesion promoter directly at this time)
Soap and water
Isopropyl alcohol (IPA)
320-600 grit sandpaper
Clean, lint-free cloths
The rest of your normal repair supplies (primer, paint, clear coat)
How to Apply Adhesion Promoter
The sequence below follows the raw-plastic substrate-prep protocol for ScratchesHappen aerosol primer. Customers using a different primer should also check their primer's technical data sheet — most call for the same general sequence, with minor differences in sanding grit or cleaning steps.
Clean the part with soap and water and dry it thoroughly. This is especially important on new replacement parts, which often arrive with mold-release residue that's the most common cause of adhesion failure. Soap and water gets it off; skipping this step risks the whole repair.
Wipe the part down with isopropyl alcohol. Second cleaning pass — removes anything the soap-and-water step left behind, plus any handling oils from when you handled the part during step 1.
Sand/scuff raw plastic with 320-600 grit sandpaper. This grit range gives the plastic enough tooth for the adhesion promoter to grip. (A red Scotch-Brite pad is 320 grit; a gold Scotch-Brite pad is 600-800 grit.)
Blow off and re-clean with isopropyl alcohol. Sanding dust must be removed before adhesion promoter goes on. Don't wipe with cloth alone — blow off first, use a tack cloth to pull up any loose dust remaining if needed, then a final IPA wipe.
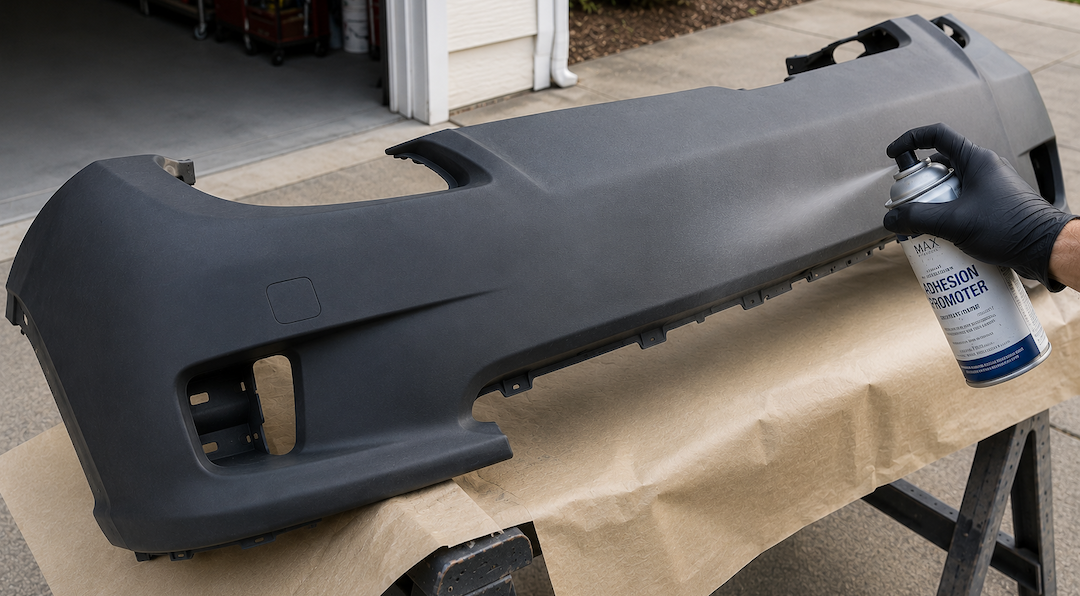
Apply one medium to light coat of adhesion promoter. Spray from 6 to 8 inches. The plastic should look dull when you're done — not glossy. A glossy surface means too much was applied and the repair will fail. Allow the flash time on the label.
Apply primer within the product's active window. This is the step first-time users miss most often — see below.
Important: Don't Miss the Active Window
Adhesion promoter only works for a limited time after application — typically 10 to 30 minutes from the last coat, depending on the product. If you wait too long before applying primer, the adhesion promoter loses its bonding effect, and the surface needs to be re-cleaned, re-scuffed, and re-treated before you can continue. Always check your product's specific active window on the label before you start, and have your primer ready to go when you finish the adhesion promoter coats.
Adhesion Promoter vs. Primer vs. Flex Agent — What's the Difference?
These three products show up in plastic repair conversations and they are not interchangeable.
Adhesion promoter goes on the plastic before primer. It bonds large areas of plastic to primer.
Primer goes over adhesion promoter (or directly on bare metal). It fills small imperfections, tints the surface so the color reads correctly, and gives the paint something sandable to bond to. See When Should I Apply Primer? for the primer decision.
Flex agent is mixed into large professional paint quantities (applied via an HVLP gun) to make the cured film flexible enough to bend with the part. ScratchesHappen aerosol paints are formulated to be flexible enough for typical bumper repairs without a flex agent. Adhesion promoter is the more relevant question for most large plastic repairs.
A note on "plastic prep" products: that name is used inconsistently in the market. Some products labeled "plastic prep" are cleaning solvents only (degreasing). Others are marketing names for adhesion promoter. Read the label and confirm what the product is actually doing before you treat it as either step.
FAQ
What happens if I skip adhesion promoter on a large plastic repair?
Paint may look fine at first but is likely to flake or peel once the part flexes — at the first parking-lot bump, cold morning, or impact. Bumpers and other flexible parts are designed to bend without breaking, and the paint has to bend with them. Without adhesion promoter on a meaningful area of bare plastic, paint can't keep up with that movement and lets go.
How can I tell if my part is plastic or metal?
Most modern bumpers, spoilers, body cladding, and fender flares are plastic. A magnet won't stick to plastic. You can also tap the part — plastic sounds duller, metal sounds tinnier.
My bumper is painted from the factory and I'm fixing a small chip. Do I need adhesion promoter?
No. The factory paint across the whole bumper is already adhered to the plastic underneath. If you see a bit of plastic in the chip, apply primer + paint + clear coat. Adhesion promoter is for cases where bare plastic is exposed across a medium to large area.
Can I just use more primer instead of adhesion promoter?
No. Primer doesn't bond well enough to large areas of TPO or similar plastics. Adhesion promoter solves the large bending plastic-bonding problem.
Where do I get adhesion promoter?
We don't currently sell our own adhesion promoter. You can source adhesion promoter online or on Amazon easily.
Can I use adhesion promoter on metal parts?
It's not necessary. Primer bonds to small to large areas of bare metal directly without a tie coat. Adhesion promoter is specifically a solution for areas of low-surface-energy plastics. See When Should I Apply Primer? for primer decisions on metal repairs.
My replacement bumper cover came already primed. Do I still need adhesion promoter?
Probably not — if the part arrived with primer already on it, the supplier has already handled the plastic-to-coating bond. Confirm with the supplier if you're unsure.
Pre-primed parts might still have some mold residue left on them that must be removed before the repair. Clean, degrease and scuff before applying paint.
Note some after-market pre-primed parts nowadays come with just one thin coat of primer that may not be sufficient. If you are cleaning the part during prep and find the primer is wiping off with IPA, then you will need to wipe it all off, apply adhesion promoter and then re-apply primer.