Wrinkling happens when fresh paint dries on top before the layer beneath cures — the drying top shrinks and lifts the soft layer below. Common causes: heat, high humidity, thick coats, or poor adhesion underneath. The fix: sand back to a sound layer, address the cause, and reapply in lighter coats.
Quick Reference
What you saw at application | Likely cause | Fix |
Wrinkled almost immediately, or during the next coat | Heat (hot surface — air temperature can be misleading) | Move to shade, let the surface cool until you can hold your hand on it, lighter coats |
Wrinkled after the second or third coat went on | High humidity | Wait for drier conditions, lighter coats with more flash time |
Wrinkled where paint pooled, or after clear coat went on early | Coats too thick or applied too soon | Lighter coats, full flash time before next coat (including clear) |
Wrinkled regardless of coat thickness or conditions | Poor adhesion in the layer beneath | Remove the failed layer, re-prep with adhesion promoter + primer, then reapply |
What's Happening When Paint Wrinkles
All wrinkling shares one underlying mechanism: as fresh paint dries, it shrinks slightly — that's normal. The shrinking top coat pulls gently on the layer underneath. If that layer is fully cured and well-bonded to what's below it, nothing visible happens. If the layer beneath is still soft (not yet cured) or poorly adhered, the shrinking top coat lifts it into creases and ridges.
That gives you two paths to wrinkling, with related but distinct fixes:
The layer beneath wasn't fully cured when the next coat went on.
This is the most common scenario. Heat dries the top of a coat before the bottom cures. High humidity slows bottom drying so the top finishes first. Thick coats leave a wet bottom under a drying top. Applying the next coat (or clear coat) too soon does the same thing — the previous coat is still wet underneath when the new one goes on. In all these cases, the shrinkage during drying lifts the soft layer.
The layer beneath had poor adhesion to start with.
Less common but worth knowing. The previous layer was applied to a contaminated surface, to a plastic part without adhesion promoter, or over a cheap after-market part primer that never bonded well in the first place. In this case, the shrinkage doesn't need to lift an uncured layer — it pulls a poorly-bonded layer right off the substrate.
The four causes below walk through each scenario and the specific fix.
Cause 1: Heat
The temperature that matters for paint application is the surface temperature of the panel — not just the air temperature around you. It's easy to underestimate the gap between the two. On a 75°F day, a hood or bumper sitting in direct sunlight can easily reach 110–140°F. Darker panels run hotter; black panels in summer sun routinely exceed 150°F. The thermometer outside doesn't tell you what the paint is about to land on.
When the surface is hot, the top of each coat skins over almost immediately while solvents are still trying to evaporate from below. The skin traps the solvent. When the next coat goes on and shrinks during drying, the still-wet layer underneath can't resist and lifts into wrinkles.
The Fix
Move out of direct sunlight. Work in shade, indoors, or in a garage with the door open for ventilation.
Hand-check the surface. Touch the panel with the back of your hand. If you can hold it there comfortably, the surface temperature is fine. If you want to pull your hand away, the surface is too hot — wait for it to cool.
Match the can temperature to the air and panel. If the can has been sitting in sun or a hot vehicle, set it in room-temperature water for a few minutes to bring it down. If it's been somewhere much cooler than where you're painting, give it time to warm up. The goal is can, air, and surface all at roughly the same temperature before you spray.
Apply lighter coats. Less paint per coat means less solvent to evaporate, which reduces the skin-and-trap risk.
Cause 2: High Humidity
High humidity slows the bottom of each coat from drying while the top continues to dry normally. The next coat goes on and the same wrinkling mechanism takes hold.
The Fix
Wait for drier conditions if you can — early morning or evening in humid weather is often drier than midday.
Apply lighter coats. Less paint per coat means faster bottom drying.
Extend flash time between coats. If the air is humid, give each coat additional minutes before the next one goes on.
See Painting in High Humidity for more detail on humidity-specific application adjustments.
Cause 3: Coats Were Too Thick or Applied Too Soon
A thick coat traps wet paint at the bottom under a drying surface on top. So does applying the next coat — including the clear coat — before the previous one has flashed off. The previous layer is still wet underneath when the new one goes on; when the new coat dries, the still-wet layer below can't resist the shrinkage and wrinkles.
This is the most controllable cause — thinner coats and proper flash time prevent it entirely.
The Fix
Apply paint in lighter coats. The goal is coverage in 3–4 light, even passes rather than 1–2 heavy ones.
Hold the can the right distance from the surface (typically 6–8 inch for base [coverage] coats and 10-12 inch for drop [orientation] coats) so coverage is uniform rather than pooled in one spot.
Let each paint coat flash off fully before applying the next. The surface should look matte and feel dry to a light touch, not glossy or tacky.
Wait for the paint coats to fully dry before applying clear coat. Clear over wet paint is one of the most common causes of wrinkling at the clear-coat stage. See Drying Time Summary for the timing between paint and clear.
Cause 4: Poor Adhesion in the Layer Beneath
This is the cause worth knowing about even though it's less common than the three above. If wrinkling is happening despite cool conditions, low humidity, and properly thin coats, the issue is likely poor adhesion in the layer underneath — and the fix is different.
Two common scenarios:
Replacement plastic parts with cheap after-market primer.
Replacement bumpers, spoilers, and trim parts sometimes arrive primed from the supplier with a low-quality primer that has poor adhesion to the plastic underneath. Paint applied over it bonds to the primer fine — but the primer itself wasn't well-attached to start with, and the shrinkage during drying lifts both layers together.
A previous layer wasn't well-bonded.
This can happen if the surface wasn't properly cleaned and scuffed before painting, if a raw plastic part was painted without adhesion promoter, or if a previous application coat went onto a contaminated or unprepared surface. In all these cases, the previous layer didn't bond well enough to resist normal shrinkage during drying.
The Alcohol Pad Test
A simple diagnostic for the cheap-primer-on-plastic case:
Either where the paint has lifted, or somewhere the primer is showing — wipe gently with an alcohol pad.
(You can see the primer color on the pad after wiping), the primer adhesion is poor and that primer needs to be removed.
The path forward is to remove the failed primer, then start the layer system over: adhesion promoter, then primer, then base color.
See When to Use Adhesion Promoter on Plastic Parts for the adhesion promoter step.
See Why Primer Color Matters for Your Touch-Up Color Match for primer selection.
How to Fix Wrinkled Paint
The fix path is the same regardless of cause:
Sand back to a sound, fully cured layer beneath. See What Sandpaper Grit Should I Use for Car Paint Repair? for the right grit. Sand until the surface is smooth and you've reached a layer that feels solid and well-bonded.
Identify the cause using the Quick Reference table at the top of this article.
Address the cause — cooler conditions, lower humidity, thinner coats, longer flash times, or adhesion-promoter re-prep depending on which cause applies.
Reapply in light, even coats with full flash time between each.
Important: Don't Paint over Wrinkles
Adding paint on top of wrinkled paint doesn't smooth the wrinkles out — the new paint follows the contour of the surface underneath, so wrinkles stay visible (and often get worse as more shrinkage layers on). Always sand back to a smooth surface before reapplying.
FAQ
How do I tell wrinkling from cracking?
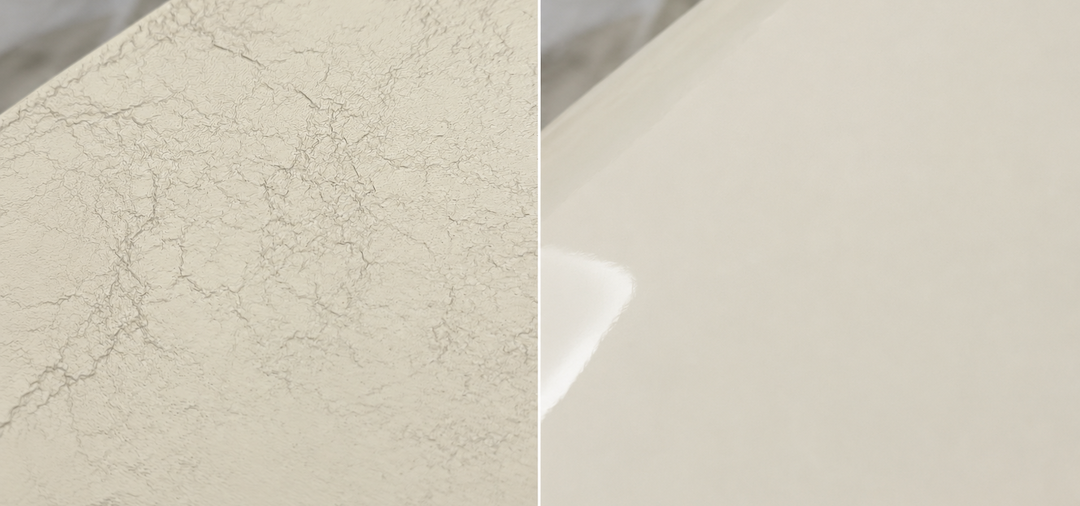
Creases: Wrinkling looks like creased, crinkled lines or ridges in the paint surface — like fabric that's been bunched up. It typically appears during or shortly after application, while the paint is still soft underneath.
Splits: Cracking is fine separations or splits in dried paint, usually appearing after the paint has cured, and the surface beneath the cracks feels firm. They have different causes — see Aerosol Clear Coat Cracking (Spider-Webbing or Hairline Cracks) for the cracking diagnostic.
Will the wrinkles smooth out if I add more coats?
No. Paint follows the contour of the surface beneath it, so additional coats over wrinkled paint stay wrinkled. Sand back to a sound layer first, address the cause, then reapply in light coats.
How do I know if the surface is too hot to paint?
Touch the panel with the back of your hand. If you can hold it there comfortably, you're fine. If you want to pull your hand away, the surface is too hot — wait for it to cool, ideally by moving to shade.
Air temperature isn't a reliable guide: on a 75°F day, a hood or bumper sitting in direct sun can easily reach 110–140°F, and darker panels can climb higher. The hand check works regardless of air temp, color, or location.
How do I know if my replacement part has cheap primer?
Use the alcohol pad test described above. Wipe a primer-exposed area gently with an alcohol pad. If the primer pigments transfer to the pad, the primer adhesion is poor and that layer needs to be removed before painting. Once it's removed, start the layer system over with adhesion promoter, then primer, then base color.
Can I just sand the wrinkles flat and keep going?
Yes — that's the standard fix. Sand back to a smooth, fully cured surface, address the cause (cooler conditions, thinner coats, longer flash times, or adhesion-promoter re-prep if it's a substrate issue), then reapply in light, even coats.