Aerosol spray splatter — an un-atomized drop of paint that hits your finish and leaves a nib or blob in an otherwise clean coat — most often comes from one of three things: a cold can with low propellant pressure, paint building up around the nozzle or your finger as you spray, or the spray tip angled into the can's rim. Less common causes (like paint stuck in the can's dip tube) are addressed further down. Manage these and the can usually sprays cleanly. If you already have splatter on a finish, you can sand it out and reapply — also covered at the end of this article.
Quick Reference
What's happening | Cause | Fix |
|---|---|---|
Can spits a drop of paint at the start of spraying | Can is too cold, propellant pressure is low | Bring to room temperature; warm gently in warm tap water if your work area is below 70°F |
Drop of paint lands on the panel mid-spray | Paint built up on your finger and got blown onto the surface | Reposition finger so it's not in the spray path; wipe finger when you pause |
Drop of paint lands after a long spray pass | Paint accumulated on the can's rim below the nozzle | Don't angle the nozzle tip forward into the rim; wipe the rim if buildup appears |
Can spits even with technique right and a warm can | Paint settled in the can's dip tube | Shake hard for 3 minutes; test spray; contact Support if still spitting |
Splatter or nibs already in your finish | Past tense — needs cleanup | Sand smooth and reapply (see below) |
What You'll Need
The aerosol can at room temperature (or warmer)
A clean, lint-free cloth to wipe the nozzle and rim
1000-grit sandpaper (only if fixing existing splatter)
320-grit sandpaper plus 600-grit (only for heavier splatter)
Cause 1: A Cold Can Has Less Pressure
When an aerosol can is cold, the propellant molecules inside have less kinetic energy — they move slower and collide less often, which drops the pressure in the can. Lower pressure means the paint comes out at a lower velocity, and some of it exits as drops rather than as a fine atomized spray. That's where the first drops of splatter usually come from — the can sputters before it gets up to spraying pressure.
Fix: bring the can to room temperature before spraying. If your work area is below about 70°F (21°C), you can warm the can further to compensate.
Warming the can safely. Place the can in a pot of warm tap water — water that's comfortable to put your hand in, not hot. NEVER use boiling water, water hotter than your hand can tolerate, or any direct heat source (heat gun, hair dryer, stovetop, sunlight on a hot day). Aerosol cans can rupture violently if overheated. Also, don't put an ice-cold can directly into warm water — let it come up to room temperature first, then warm gently from there. The goal is "comfortably warm," not "hot."
Cause 2: Watch Where Your Finger Is
Where you place your finger on the nozzle affects whether paint accumulates somewhere it can later get blown onto your finish. Two patterns to avoid:
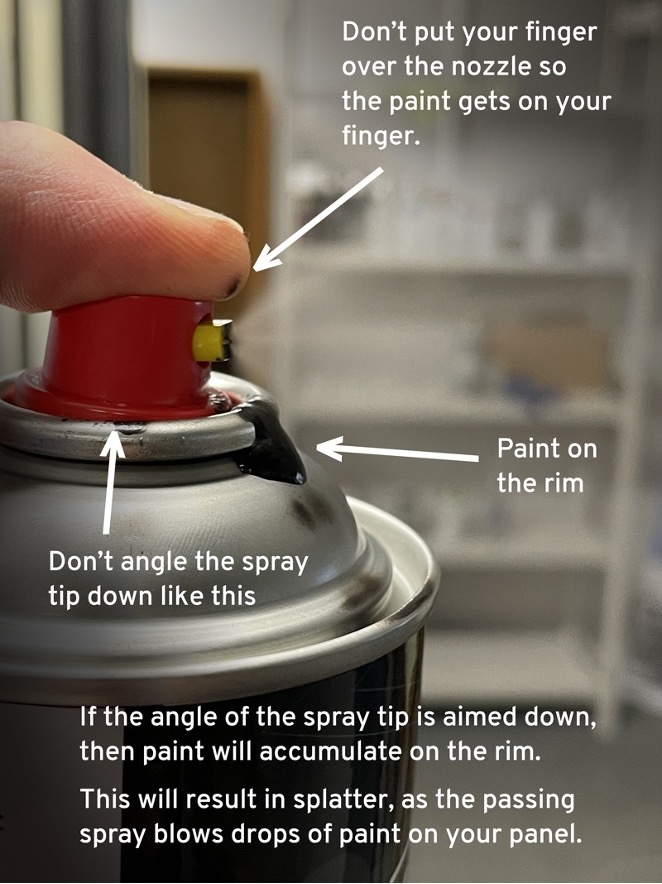
Finger draped over the front of the nozzle, so the spray fans out past your finger and deposits paint on the fingertip as it goes by. As paint accumulates, the next spray pass picks it up and blows a drop onto the panel.
Pressing the nozzle forward instead of straight down, which tilts the spray tip into the can's rim rather than out horizontally. Paint accumulates on the rim and eventually blows off onto the panel as a drop.
For the correct trigger and finger technique that prevents both of these, see Aerosol Spray Trigger Tutorial — the first section walks through pressing straight down and finger position.
Cause 3: Wipe the Nozzle and Rim When You Pause
Even with good technique, small amounts of paint can accumulate over a long spraying session — on the nozzle, your finger, or the can's rim. Each time you stop to check coverage or reposition the panel, take a quick look:
Check the nozzle tip — wipe with a lint-free cloth if it looks wet
Check your finger — wipe if there's any paint transfer
Check the rim around the nozzle — wipe if you see buildup
This five-second habit prevents most of the late-session splatter that otherwise ruins a clean repair right before you finish.
When the Can Spits Even with Good Technique
If the can spits intermittently and you've already ruled out a cold can, your finger position, and the nozzle/rim — the issue may be inside the can rather than in your technique.
Heavier pigments in some formulas can settle out of suspension and partially block the can's internal dip tube. The fix is more thorough mixing:
Shake hard for at least 3 minutes — vigorously, with the agitator ball moving freely throughout. Three minutes is longer than people usually shake; that's the point.
Test spray onto cardboard or a test card before going back to your panel. Confirm the spray comes out clean and atomized.
If the can still spits after thorough shaking and a test spray, contact Support. The can may need to be replaced.
To prevent spitting during longer projects, invert the can and briefly spray between coats to clear the dip tube before paint has a chance to settle in it.
Fix: If You Already Have Splatter or Nibs in Your Finish
Splatter that's already on the panel can be sanded out and re-coated. The approach depends on how heavy it is.
Light splatter (small nibs, scattered drops)
The affected area with 1000-grit sandpaper until the nibs are smoothed flush with the surrounding finish.
To remove all sanding dust.
Using the techniques above — clean nozzle, correct finger position, can warmed to room temperature.
Heavier splatter (larger blobs, multiple drops)
If the splatter is too thick for 1000-grit to level cleanly, drop to a more aggressive grit first:
With 320-grit sandpaper.
With 600-grit to remove the deeper sanding marks left by the coarser paper.
And re-apply paint.
The reason for the two-step grit progression: aggressive grits clog quickly on built-up paint, so you knock the bulk down with coarse paper first, then refine with finer paper before re-coating.
For grit guidance across the full repair (primer, base color, clear coat polishing), see What Sandpaper Grit Should I Use for Car Paint Repair?.
Watch the Spraying Technique
For a video walk-through of correct aerosol spray technique, see How to Spray ScratchesHappen Touch Up Paint.
FAQ
What's the minimum temperature for spraying aerosol paint?
The can itself should be at room temperature — around 70°F (21°C) — for reliable atomization. If your work area is below 70°F, warm the can in warm tap water as described above. Below about 50°F ambient, even a warmed can will struggle as it cools back down mid-spray; at that point it's better to wait for warmer conditions or move the work inside.
Can I use a heat gun or hair dryer to warm the can faster?
No. Warm tap water only. Heat guns, hair dryers, stovetops, and direct sun on a hot day can all overheat an aerosol can. Aerosol propellant is pressurized, and an overheated can can rupture violently. The water-bath method is slow on purpose — slow is safe.
Should I shake the can between coats?
Yes — give it a brief shake (10–15 seconds) before each new coat to keep the pigment evenly mixed. For longer projects, shake whenever you've paused for more than a couple of minutes.
It's also worth inverting the can and briefly spraying between coats (a half-second burst into the air or onto cardboard). This sends propellant through the dip tube and clears any paint sitting in it — a cause of mid-session spitting.
Does this advice apply to 2K aerosol clear coat too?
The same splatter prevention applies — temperature, finger position, nozzle awareness. 2K has its own additional considerations (activation, 48-hour pot life, PPE) — see How to Use 2K Aerosol Clear Coat for the full 2K how to use tutorial.